

Last updated on June 24, 2021
How to Manage an Azure Windows Virtual Desktop Host Pool with Parallels RAS
In this blog post, we cover the basics of Azure Windows Virtual Desktop host pool and how it can be managed using Parallels® Remote Application Server (RAS). In addition, we outline the advantages that Parallels RAS delivers to customers.
Definition of Azure Windows Virtual Desktop
Windows Virtual Desktop is a desktop and application virtualization service that runs on Microsoft Azure. The main features and benefits of this cloud service are listed below:
- Exclusive Windows 10 Enterprise multi-session capability. Multi-session Session Hosts allow enterprises to optimize the number of virtual machines required, thus reducing costs and management tasks.
- Host pools. These can be generated from custom images or from images available in the Azure Gallery.
- Microsoft-managed control panel. Administrators only need to manage workspaces, host pools, session hosts and templates.
Prerequisites for Using the Parallels RAS Windows Virtual Desktop Integration Feature
Below are the prerequisites required to use Microsoft Windows Virtual Desktop in a Parallels RAS setup:
- Microsoft Azure subscription. You’ll need an Azure subscription and Azure Tenant ID. You can check your Tenant ID from the Azure Portal by navigating to Azure Active Directory > Properties or by using Powershell.
- Windows Virtual Desktop user license entitlement. To run Windows 10 with Windows Virtual Desktop, you need to have one of the following per-user licenses:
- Microsoft 365 F3, E3, E5, A3, A5, Student Use Benefits or Business Premium
- Windows 10 Enterprise E3, E5
- Windows 10 Education A3, A5
- Windows 10 VDA per user
To run Windows Server 2012 R2, 2016, 2019, you’ll need:
- A per-user or per-device Remote Desktop Services (RDS) Client Access License (CAL) with active Software Assurance (SA).
View further information about licensing requirements.
- Permissions and Azure resource providers. This section refers to those permissions required for enabling resource providers on your Azure subscription and creating virtual machines (VMs).
To carry out this integration, the following Azure resource providers must be enabled: Microsoft.ResourceGraph, Microsoft.Resources, Microsoft. Compute, Microsoft.Network and Microsoft.DesktopVirtualization.
- Microsoft AD application. Create a Microsoft Azure AD application, and apply both the Group > Group.Read.All and User > User.Read.All permissions. Roles and permissions for the application should include the User Access Administrator and Contributor roles set at the resource group level.
Make sure that when adding Graph API permissions, User and Group, the permission type is Application not Delegated.
A detailed step-by-step process for creating an Azure AD Application can be found in the following article.
- Active Directory. You’ll need a Server Active Directory environment or Azure Active Directory Domain Services. Also, Server AD must be in sync with your Azure AD.
- You’ll also want to make sure that you have Azure Virtual Network to provide session hosts with a connection to the domain. Note that session hosts must be domain-joined to Active Directory and a site-to-site VPN or ExpressRoute is required if you use a hybrid Parallels RAS deployment. You’ll need a shared network location to be used for FSLogix Profile Containers, which may run on Azure Files or Azure NetApp Files. Check out all the storage options.
Enable Windows Virtual Desktop Management
You will need to begin in the Parallels RAS Console. Once you are there, follow these steps:
- Navigate to Farm > Site > Settings. Select the Features tab and find the Windows Virtual Desktop section at the bottom of the page.

Note: Windows Virtual Desktop deployment in Parallels RAS can be easily done by completing a series of wizards. You can run all of them from the Deploy Windows Virtual Desktop section in the Start category. If Windows Virtual Desktop is not configured, the Start category will take you to the Farm > Site > Settings Features tab.
- Check the Enable WVD management checkbox.
- Click Download to get the current version of WVD Agent and BootLoader and store them on the Publishing Agent or a Network share.
- The Client feature set selection specifies which client features will be available when you open a published resource in Parallels Client. Choose your selection from the dropdown menu according to the following:
- Standard: This is identical to opening and running a published resource using the Microsoft Windows Desktop client.
- Advanced: This option also uses the Windows Desktop client but adds advanced Parallels RAS Client features, such as RAS Universal Printing and Scanning, URL redirection, drag and drop, and others.
- Advanced with fallback: This option first tries to open a published resource using the Advanced feature set. If Advanced doesn’t work for any reason, it will try to open the resource using the Standard option.
- Make sure that Status is shown as Available. You can also see the current version that has been downloaded.
Create a Host pool in Azure through Parallels RAS
Host pools are a collection of one or more virtual machines (VMs) within Windows Virtual Desktop environments. Ideally, host pools VMs are sourced from the same image, Template, as this ensures a consistent delivery of service to end users irrespective of how the user sessions are load balanced across the hosts. Parallels RAS can manage standalone or template-based host pools.
Before creating a host pool from the Parallels RAS Console, we have to add a Windows Virtual Desktop provider and either create a new workspace or select an existing one.
Add a Windows Virtual Desktop provider
- Open the Parallels RAS Console. Navigate to Farm > Site > Windows Virtual Desktop, select the Providers tab, and click (+) to add a new Windows Virtual Desktop provider.
- On this page you have to choose a Name and a Description for this provider, and you need to specify your Microsoft Azure Tenant ID, Subscription ID, Application ID, and a secret key to configure your connection to Microsoft Azure.
- Click Next, review the summary, and then click Finish.
- Click Next, review the summary, and then click Finish.
This completes the first wizard in the series. On the last page, the Launch Windows Virtual Desktop Workspace wizard option is enabled by default. This automatically opens the next wizard where you can add a Windows Virtual Desktop workspace.
Add or create a workspace
- Select whether you want to create a new workspace or select an existing one. To create a new workspace, type a Name and an optional Description. Select an existing Resource Group, or create a new one, and then specify a Location. Note that the location that you select here will be used for all Windows Virtual Desktop objects, including workspaces, host pools and application groups.
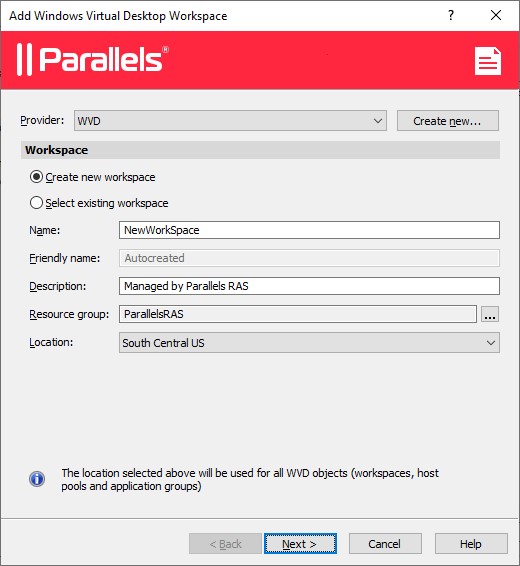
- Click Next, review the summary, and then click Finish.
The last page of the wizard has the Launch Windows Virtual Desktop host pool wizard option selected by default.
Create a Windows Virtual Desktop host pool
Once the provider and the workspace have been added, you are ready to create a new host pool through the Add Windows Virtual Desktop Host Pool wizard.
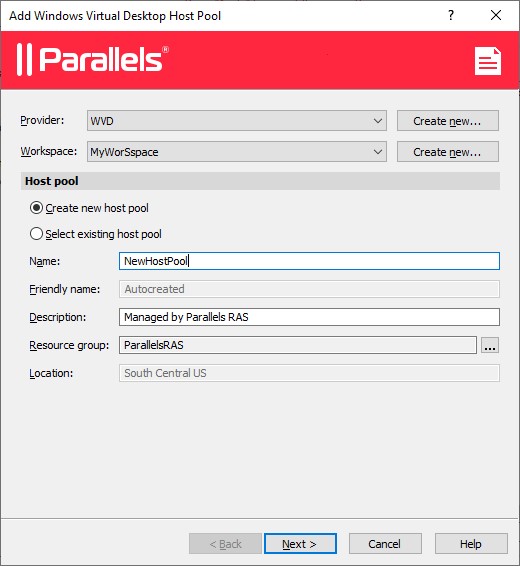
- Select the Create new host pool option, and type a Name. By default, the Description field is populated as Managed by Parallels RAS and it can be edited. Select a Resource Group
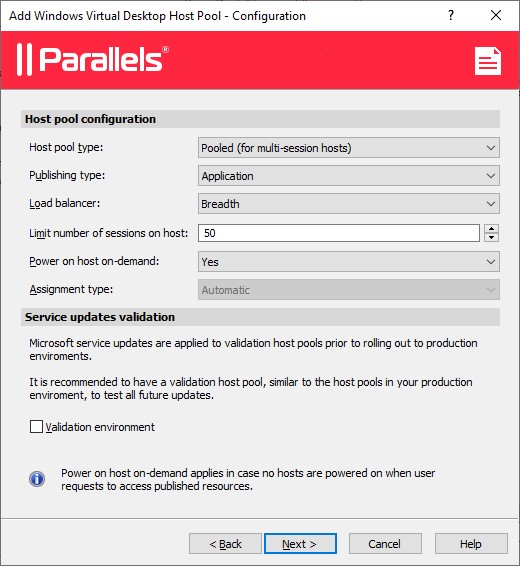
- On the Configuration page, specify the following options according to your requirements, and click Next:
- Host Pool Type: Select Personal (single-session hosts) or Pooled (multi-session hosts):
- Personal: Each single-session host within a host pool is assigned to individual users. This assignment can be Automatic, where a session host is assigned when a user establishes the first connection to the host pool, or Direct, where the assignment of users to their corresponding session hosts is predefined by administrators.
- Pooled: All session hosts within a host pool are shared among all authorized users. Windows Servers promoted to RD Session Hosts or Windows 10 Enterprise multi-session, which is only available through the Azure Windows Virtual Desktop service, are commonly used for this use case.
Further information about load-balancing methods can be found here.
- Publishing type: Select from Application or Desktop depending on your desired use for the pool. A host pool can only publish applications or desktops, but not both at the same time. An application group of the appropriate type (Desktop or RemoteApp) for the host pool is created automatically.
- Load balancer: This option determines how incoming connections will be balanced among all available session hosts. Choices are:
- Breadth first: User sessions are distributed across the session hosts in a host pool. A new incoming connection will be distributed randomly to any of half the set of those session hosts with the least number of running sessions.
- Depth first: User sessions are balanced to the same session host until it reaches its predefined maximum number of users. Once this happens, new user-sessions are redirected to the next session host in the pool until it reaches its limit and so on.
- Limit number of sessions on host for a pooled pool type: This value
establishes the maximum number of users that you want load-balanced to a single session host. - Power on host on-demand: This specifies whether a powered-down host is
powered on when a user tries to connect to it when all hosts in the host pools are powered down. - Validation environment: Select this checkbox if you want to make this host
pool a validation environment for Microsoft service updates.
- On the Provisioning page, select whether this host pool will contain template-based or standalone hosts,and click Next:
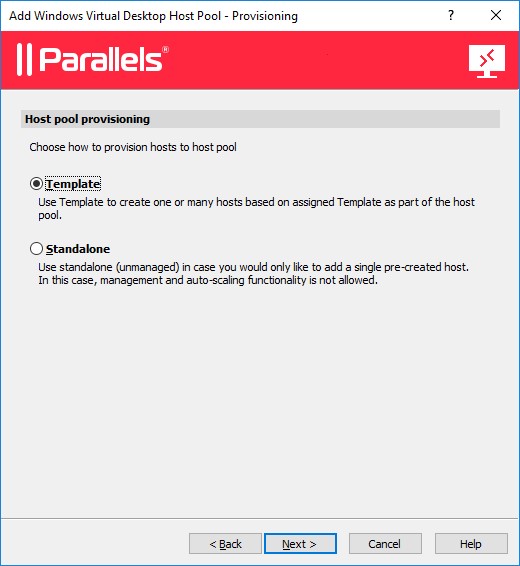
- If Standalone is selected, select one or more hosts to be included in the host pool. If Template is selected, you can select the template, create a new one or skip this step and configure the template later.
- On the Assignment page, specify users or groups to be assigned to the application group in the host pool. This is necessary for users to have access to their published applications and desktops.
- Follow the on-screen instructions, and complete the wizard.
Manage Existing Pools
To manage Windows Virtual Desktop host pools, navigate to Farm > Site > Windows Virtual Desktop and select the Host pools tab. To view and modify the properties of a host pool, right-click on it and choose Properties. In the dialog box that opens, select the corresponding tabs to view or modify the host pool properties according to your needs:
General: You can enable or disable the host pool, modify its description and view its general properties.
Configuration: You can modify the following properties on this page: load balancer, limit number of sessions on host, power on host-on-demand, and Validation environment.
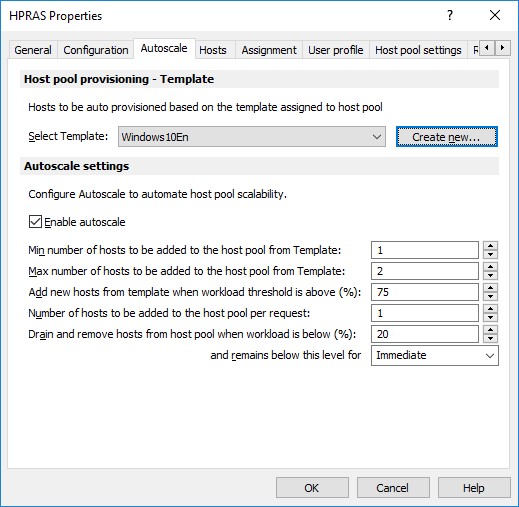
Autoscale: This tab is shown only for hosts with template as a provisioning type. You can select a template and also create a new one. As shown in the image above, the Autoscale settings tab determines how hosts will be created or removed automatically based on distinct predefined values.
Hosts: This tab lists hosts from the corresponding host pool and shows the status of each host as well as other properties. If the host provisioning is configured as Standalone, you can add new hosts to the pool from here.
Assignment: This tab displays Active Directory users, shows groups assigned to Azure Active Directory objects and allows you to create new assignments.
User profile: You can configure the user profile functionality. The available options are Do not manage by RAS or FSLogix.
Optimization: This allows you to configure settings that will be used to optimize session hosts.
Host pool settings: This tab allows you to configure settings such as session timeouts, client URL/Mail redirection, drag and drop, and others.
RDP printer: You can configure the renaming format of redirected printers.
Simplify the Management of Windows Virtual Desktop with Parallels RAS
Parallels RAS enriches and extends Windows Virtual Desktop capabilities by providing organizations with a unified administrative and end-user experience. Below are summarized some of the key benefits of using Parallels RAS with Windows Virtual Desktop:
- Simplified deployment and management through wizard-driven interfaces from a single pane of glass, the Parallels RAS Console.
- Flexibility to choose from on-premises, hybrid and public cloud deployments, as well as between Windows Virtual Desktop and independent heterogeneous Windows Servers.
- Productivity by enriching the user experience through Parallels RAS built-in features such as universal printing and scanning, session pre-launch and accelerated file redirection.
- Secure mobility through multi-factor authentication (MFA) providers, granular filtering and client policies.
- FSLogix Profile Containers integration maintained by configuring and deploying this profile management solution centrally for all virtual workloads, directly from the Parallels RAS Console.
- Reduced total cost of ownership (TCO) through a single licensing model that includes all enterprise features.
Further details can be reviewed in the corresponding joint solution brief.
Any questions or need more information? Don’t hesitate to contact us.