
How to Connect External Physical Disks to a Virtual Machine in Parallels Desktop Business Edition
Parallels Desktop TM for Mac Business Edition enables end users to connect or mount physical disks to a virtual machine (VM) and treat them as internal disks.
Why connect external physical disks to VMs?
The advantages of being able to connect external physical disks to VMs include:
• Increasing the storage of your VM
• Installing Windows or another operating system (OS) to the disk
• Boot to an OS installed on that disk
• Use non-native Boot Camp installations on the connected disk
Without a solution like Parallels Desktop Business Edition, a Mac user will not be able to connect an external hard disk to a VM, if storage devices (in general) are not allowed.
Sometimes you cannot use specific USB devices in your VM. There might be cases when plugging in a USB device causes problems—for example, when the connected USB:
• Does not appear in the list of USB devices
• Disconnects automatically from the VM
• Behaves erratically in a VM
• Is not detected by the computer
Using Parallels Desktop Business Edition, you can easily connect hard disks to VMs.
How do you connect hard disks to VMs in Parallels Desktop Business Edition?
To connect a hard disk to a new VM:
1.Connect the external disk to the Mac via USB.
Note: Make sure to select Customize settings before installation when creating a new virtual machine.
2. In the virtual machine configuration window, select Hardware, select the Add button and then select Hard Disk.
3. Select Physical Disk under the Type menu and select the hard disk that you want to connect to the VM from the Location menu. Select OK.
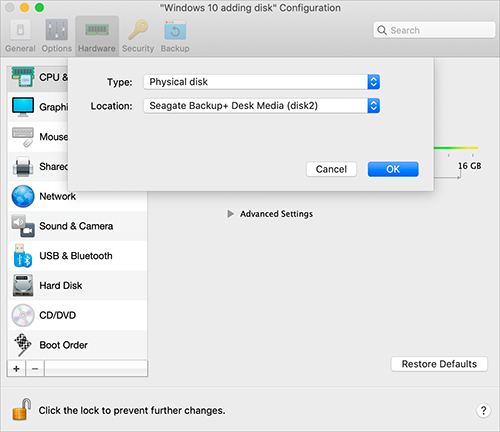
After you connect the hard disk to the VM, the physical disk appears in the VM configuration.
To use the existing data of the disk, leave it as is. When the VM boots, this disk appears next to other VM disks.
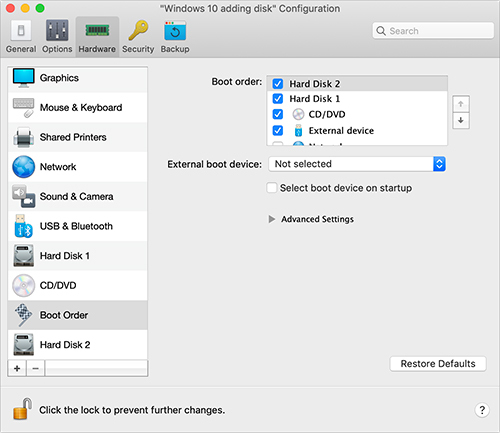
To boot the VM from this disk, select Boot Order. Use the Up arrow and move this newly added disk to the top of the Boot Order list.
To connect hard disk to an existing VM:
1.Connect the external disk to the Mac via USB.
2. Shut down your virtual machine by selecting the Parallels icon in the macOS menu and choose Actions > Shut Down.
Note: If the VM is suspended or paused, resume it before shutting it down.
3. Select the Parallels icon in the macOS menu and choose Configure. The virtual machine configuration opens. Select Hardware, select the Add button and then select Hard Disk.
4. Select Physical Disk under Type menu and select the hard disk that you want to connect to the VM from the Location menu. Select OK.
Move up to Parallels Desktop Business Edition today
Parallels Desktop Business Edition offers features such as license management, mass deployment of Parallels Desktop and VMs, corporate compliance capabilities and business-level support.
Download the free trial and find out how it can benefit your organization.