
Last updated on January 26, 2021
Advanced Touch Bar Customization with Parallels Desktop
Parallels Program Manager guest author: Alex Sursiakov
Touch Bar Support in Parallels Desktop for Mac
With Parallels Desktop® 13 for Mac (and Parallels Desktop® 14, as well), Mac® users can use Touch Bar™ for Windows applications. This function is supported in Windows 7, Windows 8, and Windows 10.
To see App Controls in Touch Bar, make sure that some of the options with App Controls are selected in macOS® System Preferences → Keyboard pane.
 (Figure A)
A Mac with Touch Bar is highly recommended. However, if you are trying to decide if it’s worth it, you can try a Touch Bar emulator like Touche on your Mac without Touch Bar. There are more than 100,000 different Windows applications that users run on a Mac with the help of Parallels. Some applications have predefined sets of Touch Bar commands, and others do not—it is impossible to support all of them.
Applications with predefined commands are:
- File Explorer
- Browsers (Microsoft Edge, Internet Explorer, Firefox, Chrome™, Opera, Vivaldi)
- Microsoft Outlook
- Microsoft Word and Word Mobile
- Microsoft Excel and Excel Mobile
- Microsoft PowerPoint and PowerPoint Mobile
There is also a set for Windows Desktop and Start Menu that you can customize by pinning your favorite applications to Windows Task Bar.
Task Bar:

(Figure B)
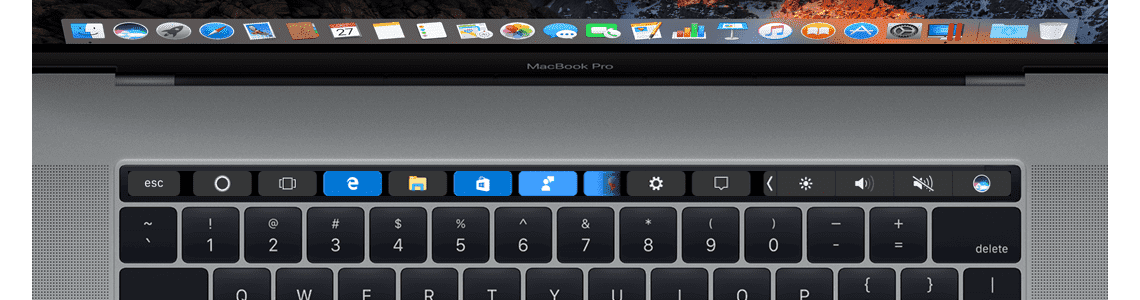
Touch Bar:
![]()
(Figure C)
So, what about other applications?
Default Touch Bar Customization
By default for all other applications, we show Functional keys:
![]()
(Figure D)
However, you can start an application and customize this set. Go to View menu and select “Customize Touch Bar ..”
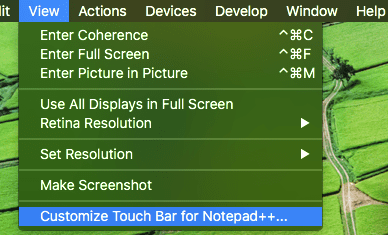
(Figure E)
You will see the following interface, where you can pretty much do what is asked: “Drag items into the Touch Bar…”
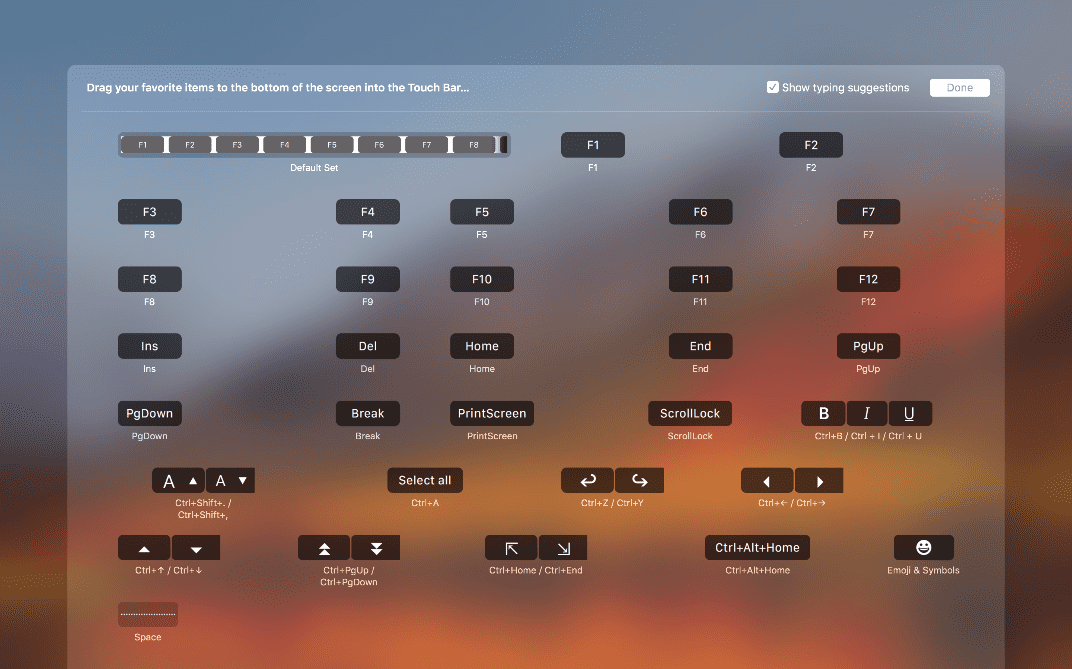
(Figure F)
If you don’t see the menu, it may be that you have enabled Functional keys for Parallels Desktop in macOS System Preferences → Shortcuts → Function Keys. Just remove Parallels Desktop from the list.
What if buttons that we have in this dialog don’t fit your needs?
Advanced Touch Bar Customization
There is a way to customize Touch Bar for any application.
All you need is to figure out how to complete the action with a keyboard, and some patience to fine-tune things.
If you are not tech savvy, then get ready to fail, fight, and ultimately succeed.
Note: Parallels doesn’t officially support this way of Touch Bar customization, so you are doing it at your own risk.
Set the Goal
First you need to understand what you want and how to achieve it.
For example, I am using Notepad++ to edit an HTML file, and I like to check how the webpage looks in different browsers.
Notepad++ has these shortcuts at hand:

(Figure G)
Ctrl + Alt + Shift + <letter>. I am not a fan of gymnastics for fingers, so I want to end up with this in Touch Bar:
![]()
(Figure H)
This is important: for an action you want to see in Touch Bar, you need to be able to achieve it using your keyboard. If this is possible, then you can create a Touch Bar button for this action.
Get Ready
Make a backup.
Parallels Desktop is an amazing software, and making a Windows backup is super easy.
In Window mode, select “Actions → Manage Snapshots…” and select “New…” here. You can also reach this item from Control Center, the Parallels icon in the menu bar, or the Windows icon in the Dock. When you are done with Touch Bar customization, you can remove the Snapshot to release disk space.
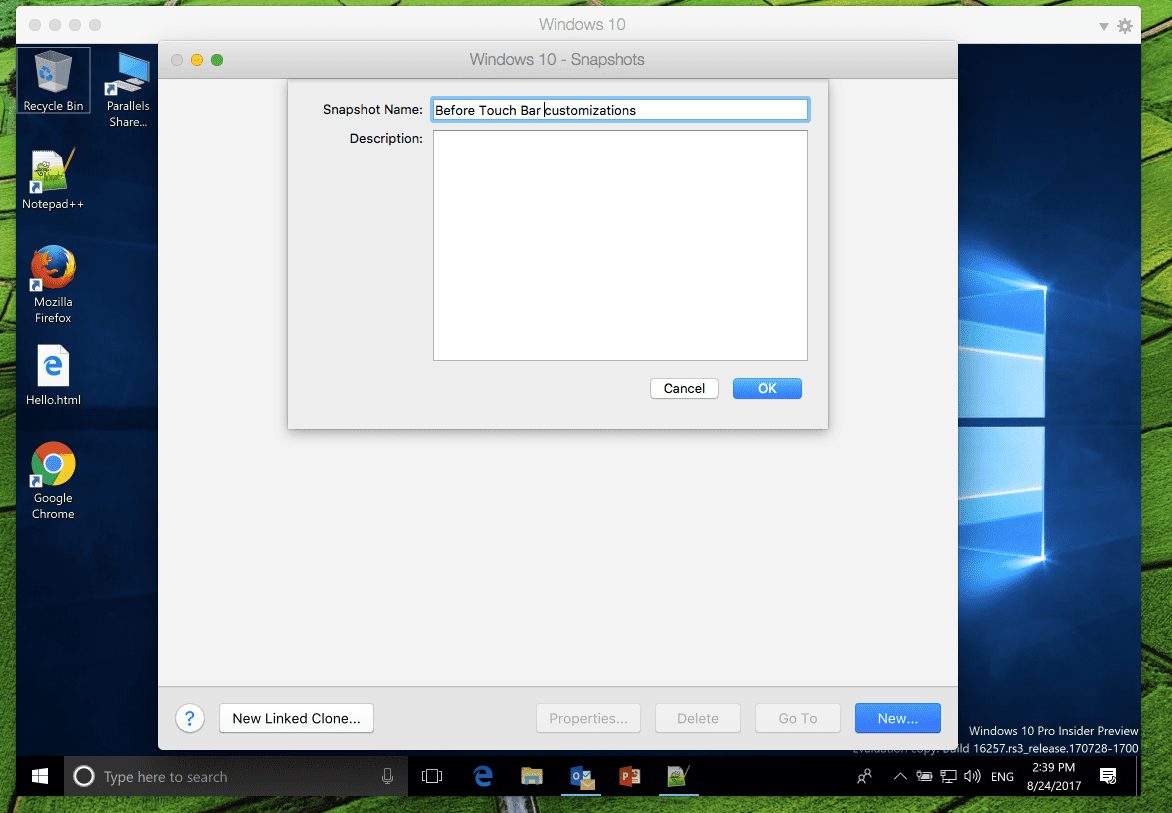
(Figure I)
Read more about snapshots here.
Add a Button
To explain to Parallels Desktop what you want to see in the Touch Bar for a certain application, you need to have an XML file with a certain name in a certain location.
In this XML file, you will describe Touch Bar buttons.
Let’s create a folder:
- Open Windows File Explorer and enter %LOCALAPPDATA% in the path field and press Enter:
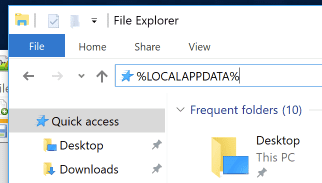
(Figure J)
- In most cases, it will open the “User name” > AppData > Local folder.
- In this folder, create a new folder named “Parallels”; in the Parallels folder, create a folder named “CustomTouchBars”.
So now it is likely to beC:\Users\<user name>\AppData\Local\Parallels\CustomTouchBars\
Then create a file. It is beneficial to use some editor with XML support. I will use the same Notepad++.
Text for the file:
<TouchBar id="application_name" defaultItemIdentifiers="button">
    <Button id="button" keyCode="alt+f4" title="Button"/>
</TouchBar>
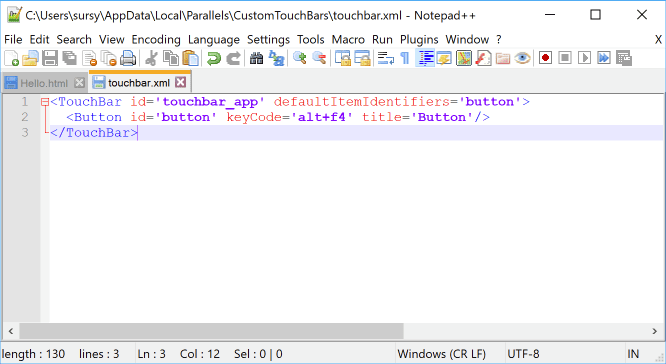
(Figure K)
Now we need to name this file properly to indicate that it is for a certain application.
Proper name format: <executable name>.exe.xml
For Notepad++, it is
notepad++.exe.xml
(Note: Sometime text processing apps will automatically change all quote marks into typographically correct quotes (also sometimes called “curly quotes”). In ordinary language, this is usually correct. For computer code (HTML, XML, or programming language text), this is usually incorrect and will prevent your code from working as expected. When you are typing any type of code, if you see this conversion taking place, make sure you turn it off. Figure K1 shows two such settings.)
Here is how to find it:

(Figure L)
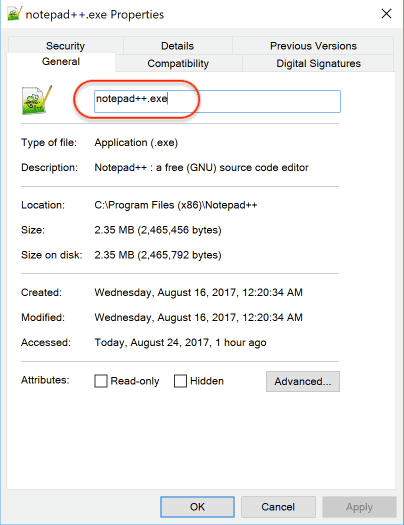
(Figure M)
Note: Sometime apps will “help” you by automatically adding a file type to any file name you enter. In the case of file you name as “notepad++.exe.xml”, this might result in the file being named “notepad++.exe.xml.xm“. For the advanced Touch Bar customization work, a file name like this will not work. You will have to ensure that the app does not add anything to the file name.
Now let’s verify it’s working. Reboot Windows, start your application, and check the Touch Bar.
If it’s working, you will see the following:
![]()
(Figure N)
Clicking the Button will quit the application in most cases.
If it doesn’t work, please make sure that you have done everything properly. If nothing helps, revert to the snapshot that you have created and repeat.
Customize the Button
For each button, we can customize the following:
- id – Mandatory field. Unique identifier of the element.
- keyCode – Mandatory field. Specifies shortcut sequence.
- title – Optional. Specifies text on the button.
- width – Optional. Specifies the width of the button, in points.
- image – Optional. Specifies the image on the button. See “Images”.
- backColor – Optional. Specifies background color of the button in RRGGBB format.
- textColor – Optional. Specifies text color of the button in RRGGBB format.
Attribute names are case sensitive.
keyCode
*Note: You must specify keyCode for every button you have.*
In the keyCode parameter, you can pass one key, several keys, or a combination of them. They will go to the applications as if you have typed/pressed them.
To pass a combination, use +.
<Button id="button" keyCode="ctrl+alt+shift+X" title="Open in Firefox"/>
To pass “+”, use plus.
<Button id="button" keyCode="plus" title="Enter a plus symbol"/>
To pass several keys in a row, use “,”.
<Button id="button" keyCode="C,o,o,l,shift+1" title="Cool!"/>
To pass “,” use comma.
<Button id="button" keyCode="comma" title="Enter a comma symbol"/>
Here is a full list of keyCodes:
- Characters: a-z
- Numbers: 0-9
- Functional keys: f1-f24
- Other keys: \/*=[]`., comma, semicolon, ins, del, home, end, pgup, pgdown, prtSc, break, ctrl, alt, shift, win, fn, scroll_lock, esc, left, right, up, down, space, tab, minus, np_minus, plus, enter, www_back, www_forward, www_search, www_home, www_stop, www_refresh, www_favorites, app_mail, app_calculator, app_computer, menu.
title
This one is easy. Specify the title text you want to see on a button. If no title or image is specified, then the keyCode will be used as a title.
width
This one is easy, too. Specify the width of the button in points. You may need to play with this, but here are some examples to get an idea:
![]()
(Figure O)
image
You may use standard images as per Apple® documentation.
For example, I like the “Open in Browser” icon:

(Figure P)
I click a link and get a constant:

(Figure Q)
I then remove ImageName from the constant name and get “NSTouchBarOpenInBrowserTemplate”
Then I can add it to the Touch Bar button like this:
<Button id="button" keyCode="ctrl+alt+shift+X" title="Open in Firefox" image="NSTouchBarOpenInBrowserTemplate"/>
Now Touch Bar will look like this:
![]()
(Figure R)
You may define custom images in xml file, but that won’t look pretty. Specify image=”base64:2x:<base64 encoded png image>”. Recommended image size is 36x36px; maximum is 60x60px.
I won’t dig into details here, but the Firefox icon will look like this:
![]()
(Figure S)
backColor and textColor
If you feel fancy, specify colors:
![]()
(Figure T)
<Button id='button1' keyCode='1' title='Crimson on Ivory' backColor='FFFFF0' textColor='DC143C'/>
Add a Second Button
Adding the second button can be done by creating another copy of a Button section and adding its id to the list of defaultItemIdentifiers of the TouchBar element.
<TouchBar id="touchbar_app" defaultItemIdentifiers="button1,button2">
    <Button id="button1" keyCode="1" title="Button1"/>
    <Button id="button2" keyCode="2" title="Button2"/>
</TouchBar>
![]()
(Figure U)
To get what I initially wanted for Notepad++, the code will look like this:
<TouchBar id="touchbar_app" defaultItemIdentifiers="firefox,ie,chrome">
    <Button id="firefox" keyCode="ctrl+alt+shift+X" title="Launch in Firefox"/>
    <Button id="ie" keyCode="ctrl+alt+shift+I" title="Launch in IE"/>
    <Button id="chrome" keyCode="ctrl+alt+shift+R" title="Launch in Chrome"/>
</TouchBar>
More Customizations for Tech-Savvy Users
At this point, you should be good. But if you are tech-savvy and comfortable with stuff like this—and want to invest more time into your Touch Bar customization—there are more elements and things to play with.
TouchBar element
The root element of an XML document. Defines elements which are displayed on Touch Bar.
- defaultItemIdentifiers – Mandatory. An array of comma-delimited identifiers of buttons included. Identifiers must point to the element of the document with the same “id” attribute or special identifiers:
-
- NSTouchBarItemIdentifierCharacterPicker – smiles button
- NSTouchBarItemIdentifierFlexibleSpace – flexible space
- NSTouchBarItemIdentifierFixedSpaceSmall – small fixed space
- NSTouchBarItemIdentifierFixedSpaceLarge – large fixed space
- escapeKeyReplacementItemIdentifier – Optional. Identifier of a button which replaces Escape key.
- principalItemIdentifier – Optional. Identifier of an item which is displayed in the center of Touch Bar.
SegmentedControl element
Container element which specifies what buttons are displayed together. Should contain children Segment sub-elements.
- trackingMode – Mandatory. Must specify “momentary”.
- separated – Optional. Should specify “true” if buttons are displayed separately.
Segment sub-element
- keyCode – Mandatory. Specifies shortcut sequence.
- title – Optional. Specifies text on the button.
- image – Optional. Specifies image on the button. See “Images”.
- width – Optional. Specifies the width of the button, in points.
Popover element
The element which specifies what button expands into a separate Touch Bar set. May show different sets for the press-and-hold scenario.
Should contain PopoverTouchBar, and may contain PressAndHoldTouchBar sub-elements that have a schema identical to other Touch Bar elements.
- title – Optional. Specifies text on the button.
- Image – Optional. Specifies the image on the button. See “Images”.
ScrollView element
The container element that shows buttons in a scrollable area. Should contain child Button elements with a defined width.
Group element
The container element for other elements. May contain any child elements.
Example
    <TouchBar id="notepad" defaultItemIdentifiers="nav,tools,templates,NSTouchBarItemIdentifierCharacterPicker,quit">
    <SegmentedControl id="nav" separated="true" trackingMode="momentary">
        <Segment id="home" keyCode="home" image="NSTouchBarGoBackTemplate"/>
        <Segment id="end" keyCode="end" image="NSTouchBarGoForwardTemplate"/>
    </SegmentedControl>
    <ScrollView id="tools">
        <Button id="open" keyCode="ctrl+o" title="Open" width="70"/>
        <Button id="save" keyCode="ctrl+s" title="Save" width="70"/>
        <Button id="find" keyCode="ctrl+f" title="Find" width="70"/>
        <Button id="replace" keyCode="ctrl+h" title="Replace" width="70"/>
    </ScrollView>
    <Popover id="templates" title="Templates">
        <PopoverTouchBar id="press"
                         defaultItemIdentifiers="time,NSTouchBarItemIdentifierFlexibleSpace,hello,world,what,is,love">
            <Button id="time" keyCode="F5" backColor="1484d5" title="Insert time" image="NSTouchBarHistoryTemplate"
                    width="120"/>
            <Button id="hello" keyCode="h,e,l,l,o" title="Hello" width="80"/>
            <Button id="world" keyCode="w,o,r,l,d" title="World" width="80"/>
            <Button id="what" keyCode="w,h,a,t" title="What" width="80"/>
            <Button id="is" keyCode="i,s" title="is" width="80"/>
            <Button id="love" keyCode="l,o,v,e" title="love" width="80"/>
        </PopoverTouchBar>
        <PressAndHoldTouchBar id="pressandhold" defaultItemIdentifiers="omw,omg,asap">
            <Button id="omg" keyCode="shift+o,m,w,shift+1" title="Omw!"/>
            <Button id="omw" keyCode="shift+o,m,g,shift+1" title="Omg!"/>
            <Button id="asap" keyCode="shift+a,s,a,p,shift+1" title="Asap!"/>
        </PressAndHoldTouchBar>
    </Popover>
    <Button id="quit" keyCode="alt+f4" title="Quit" image="NSTouchBarStopTemplate"/>
</TouchBar>
Application States
Sometimes you want to see different Touch Bar sets based on the context you have in your application. Unfortunately, this is not possible at the moment.
If you create a useful set of Touch Bar buttons for your Windows application and feel like you want to share it with others, feel free to reply here or post on Parallels forums. We also encourage you to share on Facebook or Twitter and tag us to show us your work! We’d love to share it with other users.
Interested in using the Mac Touch Bar on your Mac with Windows programs? Try our 14-day free trial here!