
Last updated on March 25, 2024
How to run Microsoft SQL on Apple silicon Macs using Docker Desktop
For developers, having a local database to work with is essential.
However, some databases, like Microsoft SQL, rely on x86_64 architecture and may not run on the latest Mac computers powered by Apple Silicon-based ARM64.
Is Microsoft SQL supported on any Mac?
No, Microsoft SQL is not supported on any macOS, including the older intel chipset.
In this post, I will guide you through running Microsoft SQL, one of the most widely used database engines, on your high-performance Apple Silicon Mac using Docker Desktop.
Please note that this tutorial only covers setting up the SQL server and not the additional tools that come with Microsoft SQL Server.
Also note that this workaround is a temporary solution, enabling you to work with the database engine prior to Microsoft releasing a version compatible with Apple Silicon.
Although some users have created scripts to run Microsoft SQL within a Windows VM (virtual machine), these methods often do not support TCP connections, making them unsuitable for applications running on the host machine. That is why we will use Docker Desktop to run the container and connect it to your Mac.
While not a long-term fix, it allows you to work with the database engine until a native version becomes available.
At the time of writing, Docker Desktop is the only container runtime environment for Apple Silicon that offers support for x86_64 containers through the Rosetta feature.
Though it’s still in beta, this feature works well enough for our purposes in this scenario.
Let us dive into the process step-by-step!
What you will need to run Microsoft SQL on Apple silicon Macs using Docker Desktop
A Mac with any Apple Silicon processor, the Docker daemon, and the Docker Desktop UI.
While you can use any UI tool for Docker, like Orb or Podman Desktop, this article will focus on the Docker Desktop. For others, you must manually enable the Rosetta support in the Docker daemon. This feature is still in beta at the time of publication.
Getting things ready
Before we can run the Microsoft SQL Server, we need to get Docker ready to run x86-64 containers. For this, we will use the Apple Virtualization framework with Rosetta enabled. Let’s get our machine ready.
- Install Docker and Docker Desktop
If you do not have this already installed, you will need to do so before getting started. You can find the instructions to do so here.
- Setup x86 emulation with Rosetta (beta)
If you use Docker Desktop, you can use the UI to change these settings. For that, you can go to Settings > Features in Development and select “Use Rosetta for x86/amd64”
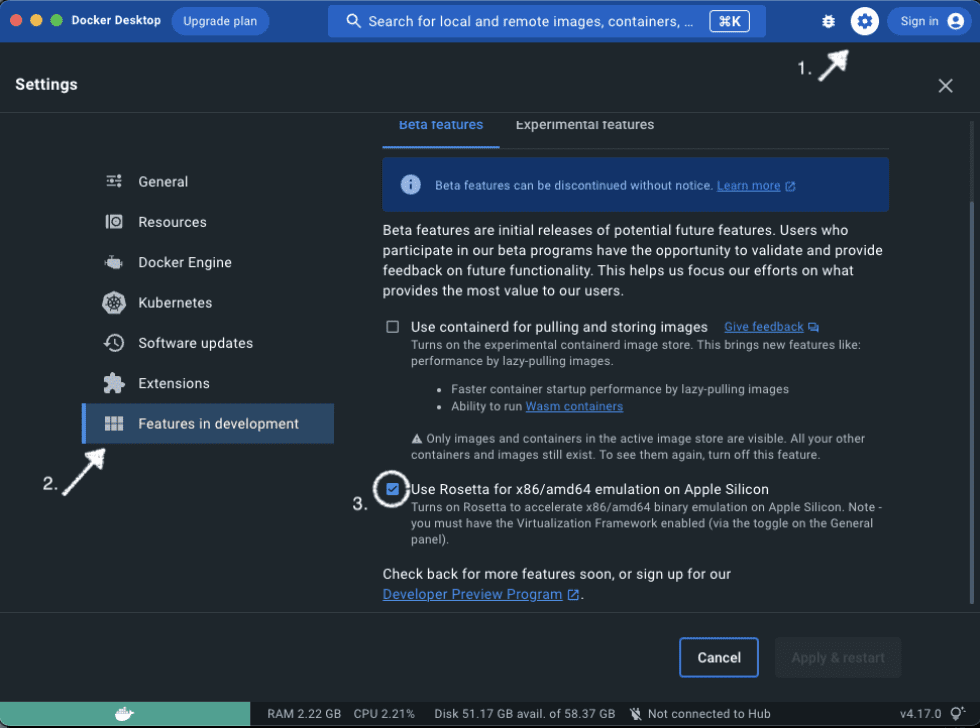
If you cannot see this option, ensure you have enabled the “Virtualization framework” in the “General” settings tab.
Otherwise, you can edit the settings.json manually and enable it and follow this page for guidance.
Running the container
We now have our system ready so that we can start our Microsoft SQL Server Container
- Open a terminal window.
- Type in the following command, changing the password to one of your choosing:
docker run -e "ACCEPT_EULA=Y" -e "MSSQL_SA_PASSWORD=VeryStr0ngP@ssw0rd" -p 1433:1433 --name sql --hostname sql --platform linux/amd64 -d mcr.microsoft.com/mssql/server:2022-latest This will download and run the official Microsoft Linux SQL Server container for x86-64, letting Docker and the Apple Rosetta x86 emulator do their job. The first time it can take a bit of time for the container to be fully available, as it needs to create all the default databases and users. Once it’s done, you should be able to access the server on the default 1433 port.
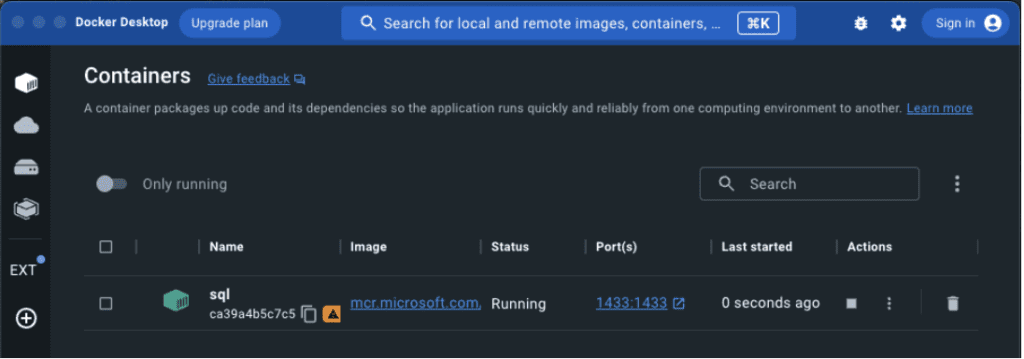
Attention: if the server fails to start, the most common issues are the password being too weak or port 1433 being used by something else. Use the Docker Desktop to view the logs and get more information to diagnose.
Persistence
Your container can handle various tasks as a fully functional Microsoft SQL Server instance. However, deleting the container without external mounting will result in the loss of all databases and data. This occurs because the container stores data internally by default. You can add an external mount for the database folder to overcome this limitation.
Using an external mount, you ensure your databases are stored outside the container. Consequently, even if the container is deleted, your data remains intact. This approach also simplifies data sharing, as you can easily copy and distribute the database folder to others.
To add an external mount to your SQL Server container, follow these steps:
- If you followed the previous method, delete the container.
- Open a terminal window.
- Type in the following command, changing the password to one of your choosing.
docker run -e "ACCEPT_EULA=Y" -e "MSSQL_SA_PASSWORD=VeryStr0ngP@ssw0rd" -p 1433:1433 --name sql --hostname sql --platform linux/amd64 -v /sql_server:/var/opt/mssql -d mcr.microsoft.com/mssql/server:2022-latest
So, what did we change? We added the -v or –volume to mount a volume in our container to a local folder. In this example, we mapped the folder /sql_server to the container folder /var/opt/mssql. You can use any local folder by changing the initial section of the mount command, for example -v /any_folder:/var/opt/mssql.
Attention: the folder must exist before attempting to run the command.
Docker Compose
Commands offer a convenient way to manage containers, but you can further automate and simplify this process by creating a Docker Compose file. Using a Docker Compose file allows you to execute tasks more efficiently, modify parameters with ease, and maintain a record of your setup for future reference.
To create a Docker Compose file, follow these steps:
- Create a new folder where you’ll store the Docker Compose file.
- In the folder, create a new text file named docker-compose.yml.
- Open the file in your preferred text editor and insert the following content:
version: '3'

services:

  sql_server:

    image: mcr.microsoft.com/mssql/server:2022-latest

    environment:

      - ACCEPT_EULA=Y

      - SA_PASSWORD=<your_sa_password>

    ports:

      - "1433:1433"

    volumes:

- <database_folder_path>:/var/opt/mssql/data - Replace <your_sa_password> with a strong password for the ‘sa’ user.
- Replace <database_folder_path> with the path to your external database folder.
Now, instead of manually executing commands, you can start your SQL Server container by running the following command in the folder containing the docker-compose.yml file:
docker-compose up -d This approach streamlines container management and makes it easier to modify parameters or share your configuration with others.
Testing that everything is working
Using Parallels Desktop and a Windows 11 Appliance, you can use the MSSMS tool, (Microsoft SQL Server Management Studio) and connect using your Mac IP address.
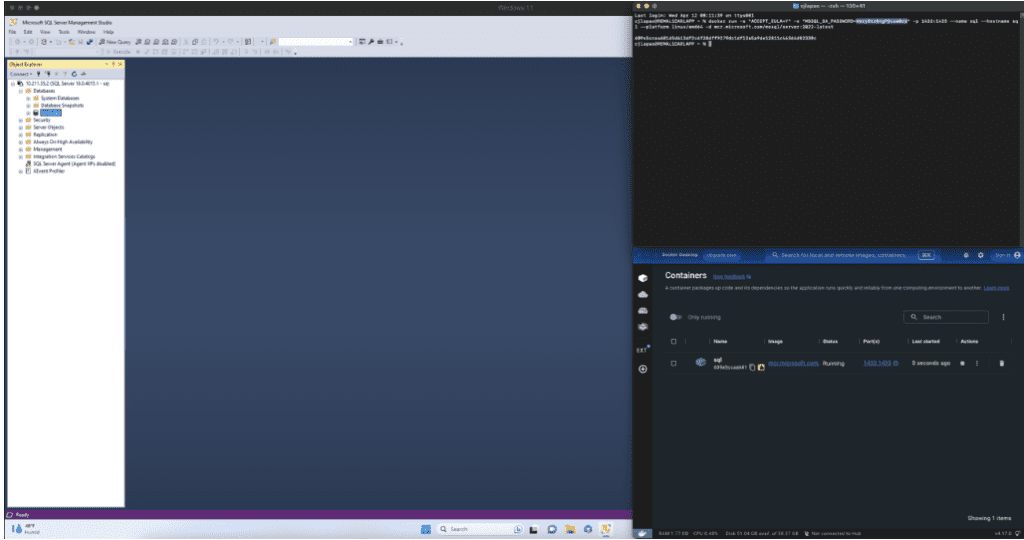
And congratulations! Microsoft SQL Server should now be running on your Mac with Apple Silicon.
Conclusion
In conclusion, setting up Microsoft SQL Server on an Apple Silicon Mac may be challenging, but it is achievable by harnessing the capabilities of Parallels Desktop and Windows 11 ARM. By creating a virtual environment on your Mac, you can enjoy the flexibility of developing Windows applications that rely on SQL Server without compromising your native macOS experience.
With Parallels Desktop, you can run multiple operating systems, including Windows 11 ARM, which is optimized for Apple Silicon Macs. This powerful combination enables you to tap into the full potential of running Microsoft SQL Server on your Mac, expanding your development possibilities and ensuring a smooth, efficient workflow.
Ready to get started? Try Parallels Desktop for yourself!